
How to create a Weapon Skin in CSGO – You’ll need Photoshop

Everyone has an idea of a Weapon Skin they’d like to see in CSGO, right? Well… You can actually design and submit your own! Created Weapon Skins can be submitted to the Steam Workshop for a chance at being added in-game, however, you can always use your own CSGO Weapon Skins in private offline matches as much as you’d like. Here’s everything you need to know about how you can create a Weapon Skin in CSGO yourself. It’s a bit of an arduous process, but well worth it if you have something in mind.
How To Create A Weapon Skin In CSGO – Step-By-Step
Step One – Download The Right Files
You can find all the files you need on the Steam Workshop page for CSGO. There are a couple of sets of files you need to look out for, though. The “.obj” files relate to the 3D model of the weapon and the “.tga” files contain the UV sheets you need to actually implement the texture onto the weapon model. You’re going to need both of these alongside a “.txt” file. Don’t worry too much about where you put them, just make sure you can find them later.
Step Two – Open The Gun Model, Get Your Texture Ready
When you open the relevant “.obj” file for the weapon of your choice, you’ll be able to start throwing your own texture onto the weapon’s 3D Model. They should all be named and relate to whatever gun you decide to make a skin for in-game. The image below is the Five-Seven, for example.
READ MORE: New CSGO art contest – Dreams & Nightmares – has a huge prize pool
All you need to do is the following…
- Open the “3D Scene” tab in the right panel;
- Select “__PS_3D_Default” and “Remove Texture” from the icon next to “Diffuse”;
- Select the same icon and click “Load Texture”;
- Select the UV Sheet relevant to the weapon you’re designing a Skin for;

- Select the same icon and click “Open Texture”. This should open in a new tab;
From here, anything you edit on the 2D Texture should be reflected on the 3D model in the first tab. This is the part where you get creative!
Step Three – Design Your Skin
All you need to do is decide what you want to throw on your Weapon Skin. For some, this is easy. For others, it can be quite a tough process. Make sure you’re checking back at the 3D model of your weapon, too. If you include any writing, it would be heartbreaking to find out it’s upside down so late in the process.
When you’re done, you need to save this as a TGA file using “.tga”.
Step Four – Convert Your File
The “.tga” file isn’t what you need in-game sadly, so you’ll need to convert it into a VTF file. To do this, all you need to do is open up VTFEdit and import the “.tga” file you have just finished working on. From here, you should be able to export the file as a VTF file to any location you want. It’s quite a simple step, all things considered.
READ MORE: Fortnite: Rainbow Royale cosmetics released to celebrate the LGBTQIA+ community
Step Five -Test In Game
Now, you’re ready to test this bad boy in-game! Open up that mysterious “.txt” file from earlier and replace “bullet_rain_m4” with the file path for your VTF file. It doesn’t matter what you’ve named it, but make sure it’s correct!
Now, it’s time to boot up CSGO. When you’re in-game, you’ll need to open up the Command Console and enter “workshop_workbench”. You can open this by pressing the key to the left of the “1”. It should type out “`” when hit normally and “¬” when SHIFT-typed.
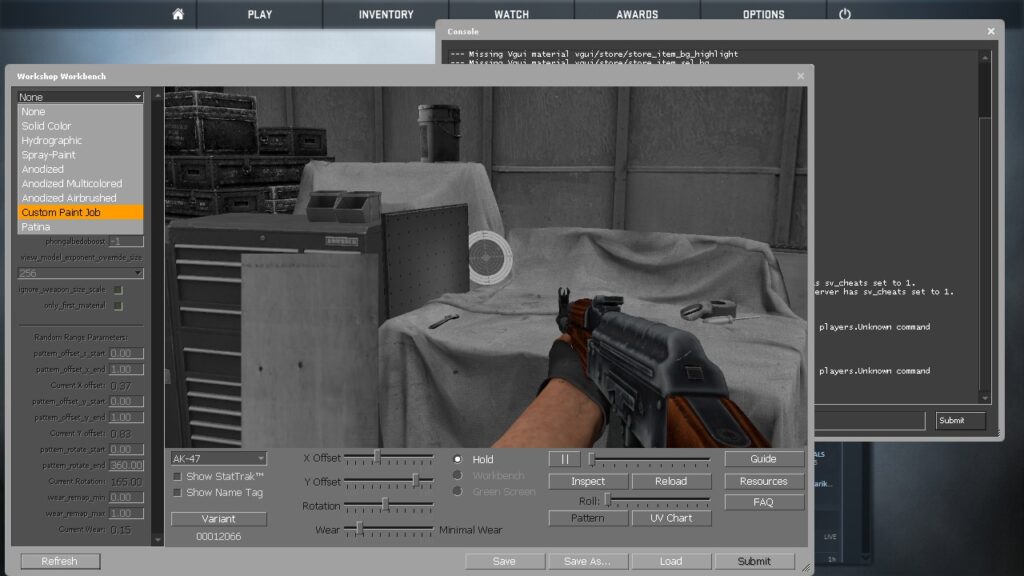
Then, you select your “Custom Paint Job” in the drop-down menu on the top left and you should be able to find your VTF file pretty easily.
Step Six – Submit When Happy
If everything looks good and you’re happy with the design you’ve put together, you can select Submit in the bottom right corner and it will open up the final step of this process.
All you need to do is fill in the relevant information and stick the “.tga” file you created into the “Source Image” section. It might have sounded complicated before, but this is how you create your own CSGO Weapon Skin.
Images via – Stat’s Guides